My VERY RUSTY VW T25 Camper Van Project
-
Envoy CDX

- Club Admin
- Posts: 9696
- Joined: Sun Sep 23, 2007 3:51 pm
- Location: Jarrow, Newcastle Upon Tyne
Re: My VERY RUSTY VW T25 Camper Van Project
Little by little 

Re: My VERY RUSTY VW T25 Camper Van Project
Okay - my OCD kicked in today.
I WASHED the entire 20 foot length (6 metres) of body wiring loom this morning.
It runs from the nearside front dash, down the outside of the bulk head, to the left longitudinal chassis rail, all the way along the underside of the van, before emerging in the engine bay.
I remember that the original simple loom was a total mare to strip off the van in one piece.
This later loom has a few extras, including electric fuel pump, rear wash / wipe, rear fogs rear window demister, and of course the connectors to the injector loom.
Plan was to look at it's overall condition, which is on the whole, quite good.
Just caked in mud and underseal.
Only repairs are to solder on a few earth tags...
The brown wires had been cut by the seller many years ago.
The starter wire had a crack in the protective plastic tubing, so I sleeved this with heat shring tubing.
From what I can tell, I only have the injector loom to sort.
I have hit that wall of uncertainty...again.!!
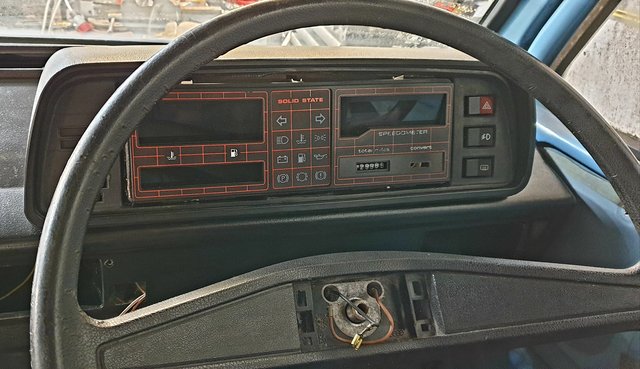
Fit the standard dash.. ?
Fit an upgraded version of the standard dash.?
Or fit the MG Maestro dash. ?
The further I go down the list, the more hassle is involved.
I have found a supplier for a dash adapter connector, but not sure if I can keep up the motivation. Especially as I need to fix a snapped ribbon cable in the digi-dash panel.
More hassle for an old git with tired eyes and clumsy fat fingers.
I WASHED the entire 20 foot length (6 metres) of body wiring loom this morning.
It runs from the nearside front dash, down the outside of the bulk head, to the left longitudinal chassis rail, all the way along the underside of the van, before emerging in the engine bay.
I remember that the original simple loom was a total mare to strip off the van in one piece.
This later loom has a few extras, including electric fuel pump, rear wash / wipe, rear fogs rear window demister, and of course the connectors to the injector loom.
Plan was to look at it's overall condition, which is on the whole, quite good.
Just caked in mud and underseal.
Only repairs are to solder on a few earth tags...
The brown wires had been cut by the seller many years ago.
The starter wire had a crack in the protective plastic tubing, so I sleeved this with heat shring tubing.
From what I can tell, I only have the injector loom to sort.
I have hit that wall of uncertainty...again.!!
Fit the standard dash.. ?
Fit an upgraded version of the standard dash.?
Or fit the MG Maestro dash. ?
The further I go down the list, the more hassle is involved.
I have found a supplier for a dash adapter connector, but not sure if I can keep up the motivation. Especially as I need to fix a snapped ribbon cable in the digi-dash panel.
More hassle for an old git with tired eyes and clumsy fat fingers.
-
Envoy CDX
- Club Admin
- Posts: 9696
- Joined: Sun Sep 23, 2007 3:51 pm
- Location: Jarrow, Newcastle Upon Tyne
Re: My VERY RUSTY VW T25 Camper Van Project
Sounds like a conundrum indeed, I think you have to ask what will give you more satisfaction come the end of it, and how much work will it be to change down the line should you decide otherwise.
It'll come good whichever route you go, you're good like that.
It'll come good whichever route you go, you're good like that.

Re: My VERY RUSTY VW T25 Camper Van Project
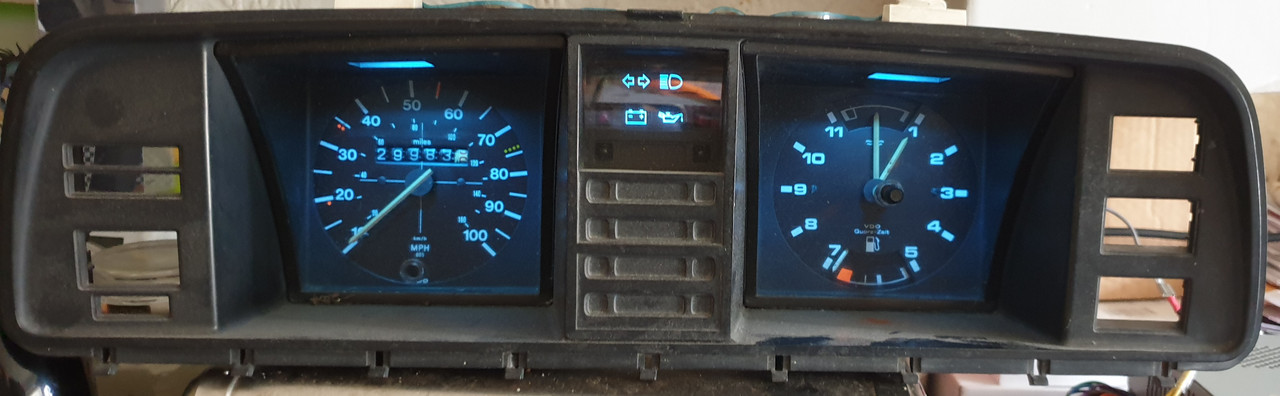
Why did you go down the MG route in the first place?
David
Re: My VERY RUSTY VW T25 Camper Van Project
You know that I love a challenge... and the mantra "because I can".
But that is tempered by sod's law that likes to throw a spanner in the works.

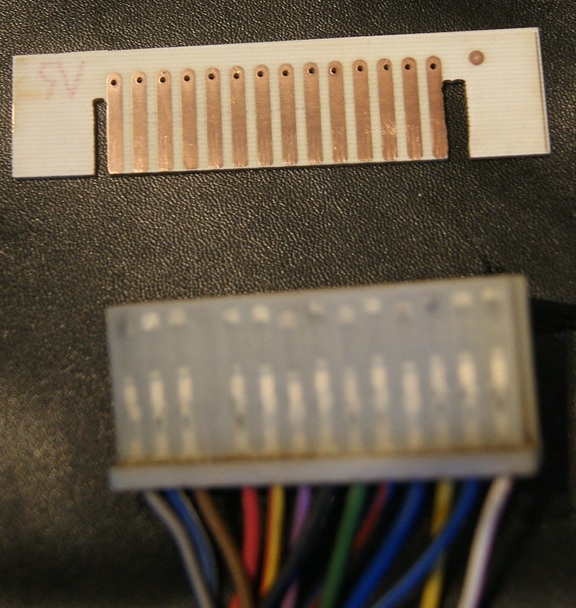
I have planned all along that I would not damage the original looms and connectors - meaning that the original dash will plug straight in if I change my mind.
Here is a loom connector and adapter pcb.
The adapter pcb is quite cheap, and will easily solder to the wires on the Maestro dash.
Re: My VERY RUSTY VW T25 Camper Van Project
Well the challenge has been called off.
I have explained in my Random thread.
Back to proper van stuff, and stop faffing with nonsense ideas.
So back to plan B...
I have explained in my Random thread.
Back to proper van stuff, and stop faffing with nonsense ideas.
So back to plan B...
-
Envoy CDX
- Club Admin
- Posts: 9696
- Joined: Sun Sep 23, 2007 3:51 pm
- Location: Jarrow, Newcastle Upon Tyne
Re: My VERY RUSTY VW T25 Camper Van Project
Re: My VERY RUSTY VW T25 Camper Van Project
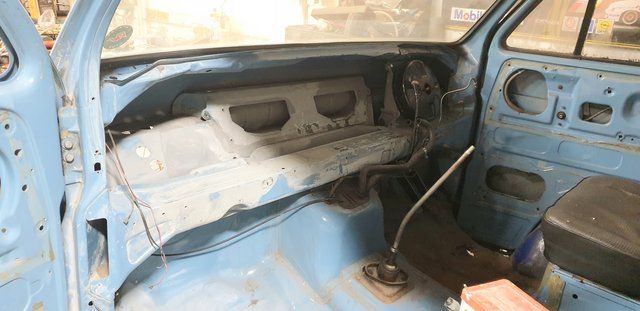
For what seems like an eternity - 16 weeks perhaps??, I have been scrubbing, rubbing and using whatever other method I could to remove what looks like lining paper and evostick from the whole of the van's interior.
A few weeks ago, this took it's toll on the skin of my right hand. Various chemicals like white spirit and plus-gas used to dissolve the glue had started to attack and dry-out my fingers.
Thankfully, two week's of applying hemp cream has managed to ease the dehydration and irritation of the skin.
And I finally started to wear surgical gloves...
Then I discovered that a rose or cup-type wire brush allowed me to whizz the material off the van much quicker.
Let the drill do the work, not pressing on too hard.
Here is an action shot.
(Not easy holding the phone in one hand and the drill in the other - ha).
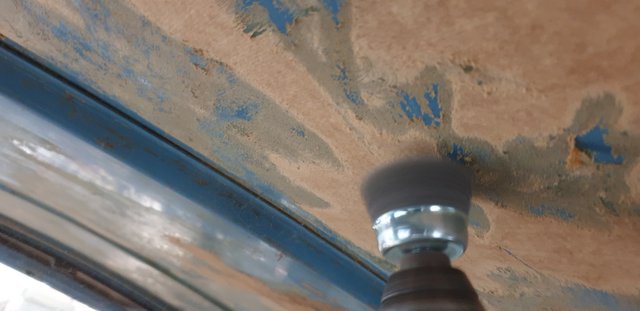
As you can see, getting there very slowly.
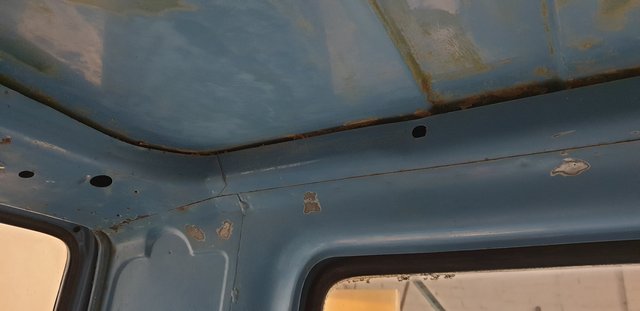
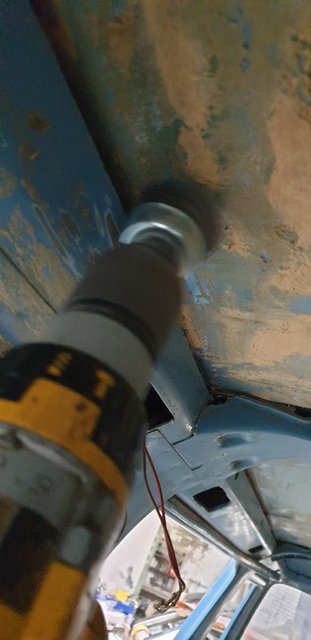
For the last hour or so, boredom with the lining stripping set in, and I finally allowed Troy to do some welding.
He is very O.C.D. (which is great) that everything should sit right and all joins and panel gaps should be correct.
As you can see, he has re-done the B post again.
And finally he has tacked in the main near-side wheel arch panel.
Puddle welded at the rear only at the moment.
Temporary self-drilling and tapping screws for alignment further forward.
Apologies for the photo angle...
But progress is starting to be made again
A few weeks ago, this took it's toll on the skin of my right hand. Various chemicals like white spirit and plus-gas used to dissolve the glue had started to attack and dry-out my fingers.
Thankfully, two week's of applying hemp cream has managed to ease the dehydration and irritation of the skin.
And I finally started to wear surgical gloves...
Then I discovered that a rose or cup-type wire brush allowed me to whizz the material off the van much quicker.
Let the drill do the work, not pressing on too hard.
Here is an action shot.
(Not easy holding the phone in one hand and the drill in the other - ha).
As you can see, getting there very slowly.
For the last hour or so, boredom with the lining stripping set in, and I finally allowed Troy to do some welding.
He is very O.C.D. (which is great) that everything should sit right and all joins and panel gaps should be correct.
As you can see, he has re-done the B post again.
And finally he has tacked in the main near-side wheel arch panel.
Puddle welded at the rear only at the moment.
Temporary self-drilling and tapping screws for alignment further forward.
Apologies for the photo angle...
But progress is starting to be made again
Re: My VERY RUSTY VW T25 Camper Van Project
Looks great. I've recently discovered how iritating it can be to get panel gaps spot on. Nothing wrong with a bit of O.C.D.
Re: My VERY RUSTY VW T25 Camper Van Project
I agree -
I like O.C.D.
I think a lot of "enthusiasts" have an element of O.C.D.
Mine is electrics.
No point doing a half-ass job.
It will either look wrong, or it will want re-doing all over again very soon.
I like O.C.D.
I think a lot of "enthusiasts" have an element of O.C.D.
Mine is electrics.
No point doing a half-ass job.
It will either look wrong, or it will want re-doing all over again very soon.
-
cavalier1990
- Registered user
- Posts: 1465
- Joined: Wed Jun 29, 2011 9:15 pm
- Location: Paisley, Scotland
Re: My VERY RUSTY VW T25 Camper Van Project
My OCD can work against me a lot of the time, and means I do a big fat nothing, but in the main it's good to be a bit picky, especially when doing a rebuild, and especially panel alighnment. I have had a few times I've thought just get on with it, and then the finished job looks crap and decide I need to strip it all off and start again.
-
Envoy CDX
- Club Admin
- Posts: 9696
- Joined: Sun Sep 23, 2007 3:51 pm
- Location: Jarrow, Newcastle Upon Tyne
Re: My VERY RUSTY VW T25 Camper Van Project
I can sympathise with that entirely!cavalier1990 wrote: ↑Sun May 30, 2021 8:34 am My OCD can work against me a lot of the time, and means I do a big fat nothing, but in the main it's good to be a bit picky, especially when doing a rebuild, and especially panel alighnment. I have had a few times I've thought just get on with it, and then the finished job looks crap and decide I need to strip it all off and start again.
Re: My VERY RUSTY VW T25 Camper Van Project
This week it was clean up the welds and epoxy primer the metal to hold the rust at bay.

And then strip out the whole dash to clean up any blemishes and remove a few snapped rusty self tappers.
Slow but steady progress.
And then strip out the whole dash to clean up any blemishes and remove a few snapped rusty self tappers.
Slow but steady progress.
Re: My VERY RUSTY VW T25 Camper Van Project
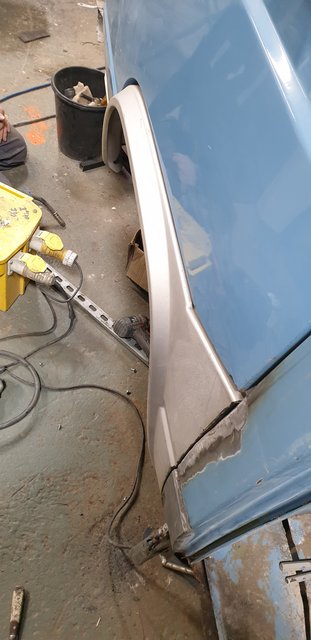
Any progress is good. Is the arch genuine or pattern?
Re: My VERY RUSTY VW T25 Camper Van Project
It is a pattern part made only 5 miles from my home.
A pretty good fit and good overall quality
A pretty good fit and good overall quality
Re: My VERY RUSTY VW T25 Camper Van Project
Sounds like you've been lucky, so far every pattern part part I've been forced to use when I couldn't source any genuine haven't fitted very well or been made out of poor quality metal.
-
cavalier1990
- Registered user
- Posts: 1465
- Joined: Wed Jun 29, 2011 9:15 pm
- Location: Paisley, Scotland
Re: My VERY RUSTY VW T25 Camper Van Project
What epoxy primer are you using Robsey? I got mine from rust.co.uk, quite good at holding back the rust on new panels or welds if you don't intend on completely finishing/sealing the work till later. The thinners you have to use for epoxy is lethal though!
Re: My VERY RUSTY VW T25 Camper Van Project
The epoxy etch primer that I use is -
TechniQ 220 1K High Build Etch Rapid Primer 1L Car Paint BARE METAL RAL7042
I don't use any thinners at present, and I just brush it in to all gaps, crevices and onto any bare metal parts that paint will not reach later in the restoration.
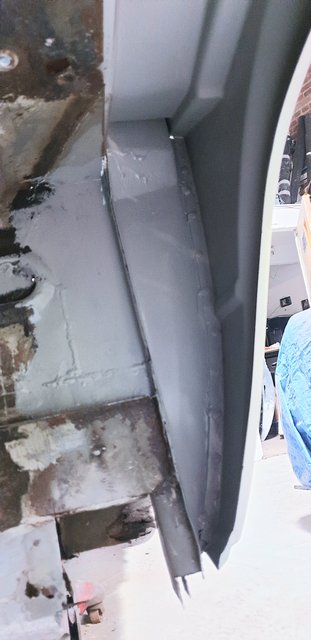
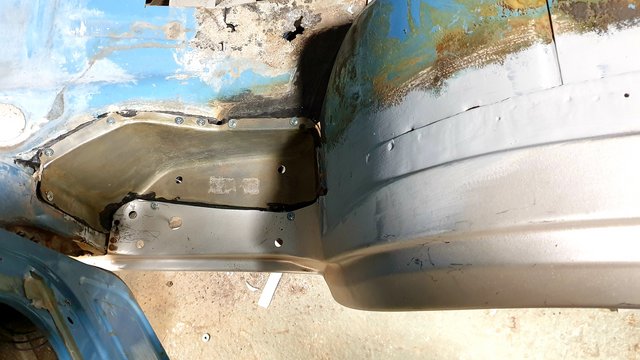
The door step was made up tonight.
A bit of a challenge as both sides of the van had been heavily rotted out, so nothing to use for visual reference.
The arch itself was spot welded in, although there were a few issues with the parent metal of the arch being dirty or rusty on the underside.
After a good clean with a belt-sander type file, it was possible to make some decent spot welds.
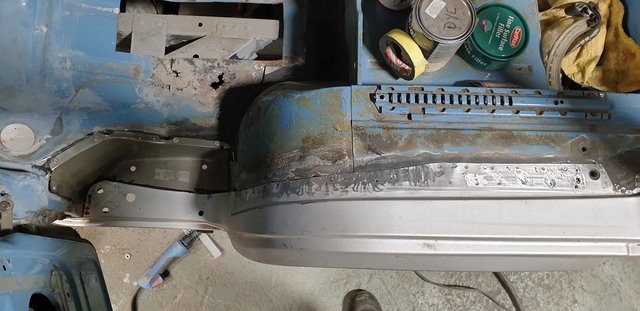
Then the door step was fitted. Not a fantastic fitting part, but a few good blows from a plastic dead-blow mallet soon teased the panel to fit.
TechniQ 220 1K High Build Etch Rapid Primer 1L Car Paint BARE METAL RAL7042
I don't use any thinners at present, and I just brush it in to all gaps, crevices and onto any bare metal parts that paint will not reach later in the restoration.
The door step was made up tonight.
A bit of a challenge as both sides of the van had been heavily rotted out, so nothing to use for visual reference.
The arch itself was spot welded in, although there were a few issues with the parent metal of the arch being dirty or rusty on the underside.
After a good clean with a belt-sander type file, it was possible to make some decent spot welds.
Then the door step was fitted. Not a fantastic fitting part, but a few good blows from a plastic dead-blow mallet soon teased the panel to fit.
Re: My VERY RUSTY VW T25 Camper Van Project
Looking good, bet it will be finished before the years out.
I've tried everything to hold back the rust , epoxy primer does seem good but the best thing I've found is red oxide primer. As you've seen I've gone to town with the out of sight bits on my van, 2 gallons so far and counting!
I've tried everything to hold back the rust , epoxy primer does seem good but the best thing I've found is red oxide primer. As you've seen I've gone to town with the out of sight bits on my van, 2 gallons so far and counting!
-
cavalier1990
- Registered user
- Posts: 1465
- Joined: Wed Jun 29, 2011 9:15 pm
- Location: Paisley, Scotland
Re: My VERY RUSTY VW T25 Camper Van Project
I think I had a tin of that years ago, but never tried it since, what is the make you use if you don't mind me asking?3cav3 wrote: ↑Tue Jun 08, 2021 7:08 am Looking good, bet it will be finished before the years out.
I've tried everything to hold back the rust , epoxy primer does seem good but the best thing I've found is red oxide primer. As you've seen I've gone to town with the out of sight bits on my van, 2 gallons so far and counting!
I also wonder if this primer epoxy and red oxide are paintoverable (if that's a word) just looks like a normal brush paint job on my rear wing that I replaced.
Re: My VERY RUSTY VW T25 Camper Van Project
I can speak for the grey TechniQ.
(Available in various colours).
I am brushing on at the moment.
It will smooth with sanding.
It also reports to be an etch primer, so should easily be paint-overable.
Final finish depends on the 'ever tedious' preparation of the panels after each coating.
Careful selection of thinners and mix ratio should provide a good enough viscocity to allow spray painting - just like any other primer.
At the moment, I am only working on parts that will not be 'on-show' due to the presence of fixtures, fittings and coverings such as carpets / rubber matting etc.
As for the red-oxide primer...
Over to you 3cav3.
If it helps Andrew,
Troy is using a black primer at the moment to paint an old style yankee 50's doo-wop style car cab and wings.
The thought being that this will bring out the best from the final black top coat.
Re: My VERY RUSTY VW T25 Camper Van Project
I'll have to dig the tin out to find the name. It seems to paint over ok, just will need several layers if using anything other than red top coat. Find that it has to fully harden for many weeks before its easy to sand, however when the sheet has blown off repaired areas and got very wet and even snowed on its held the rust totally back. Some repairs were done over 2 years ago now and are still rust free.
Re: My VERY RUSTY VW T25 Camper Van Project
Red oxide is a industrial paint used a lot by pipe manufacturers very tough and holds back the rust, look in the false ceiling of any building fitted with sprinklers and you’ll see lots of it.
Can also be used as metal primer, never tried to rub it down though as always used it on out of sight bits of the car or over painted it.
Can also be used as metal primer, never tried to rub it down though as always used it on out of sight bits of the car or over painted it.

Re: My VERY RUSTY VW T25 Camper Van Project
Red oxide was red lead paint. Red lead is no longer available. .
So red oxide these days is red dyed etch primer. You have to be careful with acid etch primer as it reacts with fillers and some primers
So red oxide these days is red dyed etch primer. You have to be careful with acid etch primer as it reacts with fillers and some primers