Page 33 of 37
Re: My VERY RUSTY VW T25 Camper Van Project
Posted: Wed Sep 13, 2023 9:11 pm
by Robsey
Here is another rust fest...

I had a right ball-ache of a time getting the sliding door middle rail off.
Spot drilled like a demon, chiselled where the drill missed, and finally wiggled the last seem weld until it broke away from the outer skin.

Nearly sliced off three fingers in the process, due to raggedy rusted panel edges and drill-hole burrs.
Re: My VERY RUSTY VW T25 Camper Van Project
Posted: Fri Sep 15, 2023 4:12 pm
by cavalier1990
That spot welding removal should be a knightable job lol, feel your pain. You're doing in the proper way though, takes a bit longer but you get the neatest and most satisying result! Meant to ask do you use any spray oil on the drill when you're removing spot welds?
Re: My VERY RUSTY VW T25 Camper Van Project
Posted: Fri Sep 15, 2023 4:31 pm
by Robsey
I have tried cutting paste, like you would use for tapping threads, but found that it did not make a huge difference.
Oil as such lubricates, and therefore stops the cutting tool from catching and cutting into the metal.
Proper cutting fluid or "facking sads" if you are from the far sarf, simply stinks after a while.
The important thing is to let the drill bit do the work.
Not too much pressure, and definitely not too much speed.
But you know that already.
Excess force risks the drill slipping all over the place, and speed risks overheating and burning the edges from the drill bit.
Re: My VERY RUSTY VW T25 Camper Van Project
Posted: Fri Sep 15, 2023 7:19 pm
by 3cav3
I all but gave up drilling out spot welds in the end, found that 99% i ended up drilling to far and made a hole through the base metal aswell. Most the time I found it as easy to thin down the outer metal with a flap disc.
Re: My VERY RUSTY VW T25 Camper Van Project
Posted: Sat Sep 16, 2023 8:26 am
by cavalier1990
I tend to use a spray oil like 3 in one spray, i think it's more about keeping the drill head cool, it still cuts ok and the drill lasts way longer. Also find if you do slow pulses with plenty pressure it chews the metal away rather that spinning too fast and polishing it.
Re: My VERY RUSTY VW T25 Camper Van Project
Posted: Sat Sep 30, 2023 9:41 pm
by Robsey
It has been a few weeks, but I thought it was time to crack on with the van.
First - a bit of Troy humour.
He calls his Nova "
Arthur Job" because he jokingly says he only ever does 'half a job'
So he has signed my van screen.
Sparkly red sticker.

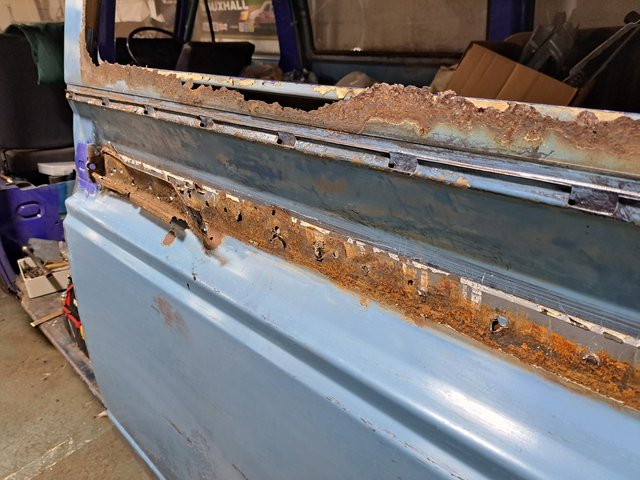
I recently bought some rear side panels, so it was only sensible to cut out some rust.
The rear arch upper panel.

The arch itself appears not to be attached due to rust.
At the front of the arch cut...
The first thing I found with the cutting disc was a big cloud of white dust.
I recognised the smell of bog immediately.
It appears that there must have been a crease in the wing.
So rather than repair it, they just filled and painted it.
But it was repaired invisibly.
Then the bottom of the window frame.

Next time... the top of the frame needs re-cutting, because it is not level. Which plays havoc with my OCD.
Re: My VERY RUSTY VW T25 Camper Van Project
Posted: Sat Sep 30, 2023 9:48 pm
by Robsey
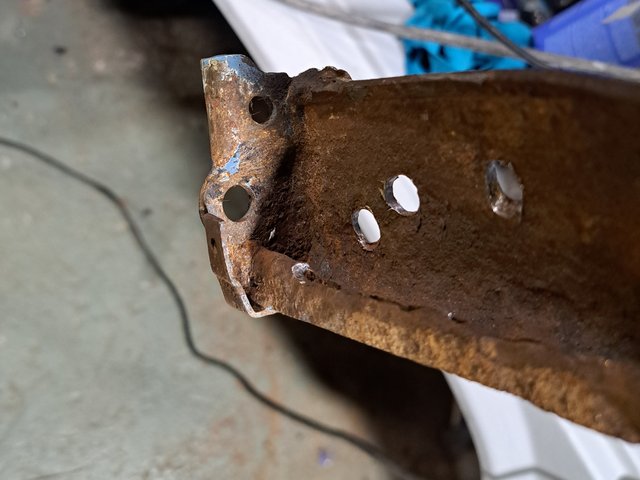
To finish the night, I ground off the welds attaching the end bracket to the slide rail...
Before, still attached.
And then bead blasted it.
It turned out quite well.

Re: My VERY RUSTY VW T25 Camper Van Project
Posted: Sun Oct 01, 2023 4:32 pm
by Envoy CDX
Nicely done Rob, it's comin together. Eventually you'll run out of rot to cut out
Re: My VERY RUSTY VW T25 Camper Van Project
Posted: Mon Oct 02, 2023 9:48 am
by vexorg
I hate rotting metal in cars.
Re: My VERY RUSTY VW T25 Camper Van Project
Posted: Mon Oct 02, 2023 11:31 am
by 3cav3
Its amazing what gets hidden over the years. I once bought a Honda prelude that had obviously had a side shunt, and rather than replace the arch, they cut it off, welded a flat plate in place then made the whole arch out of filler, so nothing actually surprises me anymore.
Re: My VERY RUSTY VW T25 Camper Van Project
Posted: Mon Oct 02, 2023 8:04 pm
by cavalier1990
The amount of of time and inventiveness to hide a bodge is probably the same or only a bit more time to do it right. I know, my cav is full of them

I always remember a guy in a garage I worked in welding an XR3i rear floor, and rather than strip the carpet out, which on an escort would have take 20 mins or less they decided to pour water onto the carpet to cool the welds

Re: My VERY RUSTY VW T25 Camper Van Project
Posted: Thu Oct 05, 2023 11:22 pm
by Robsey
Envoy CDX wrote: ↑Sun Oct 01, 2023 4:32 pm
Eventually you'll run out of rot to cut out
Eventually is the optimum phrase for this saga.
Eleven years down so far... perhaps three more years if we are lucky.
I am hoping for a big push forward on the welding front over the next few weeks.
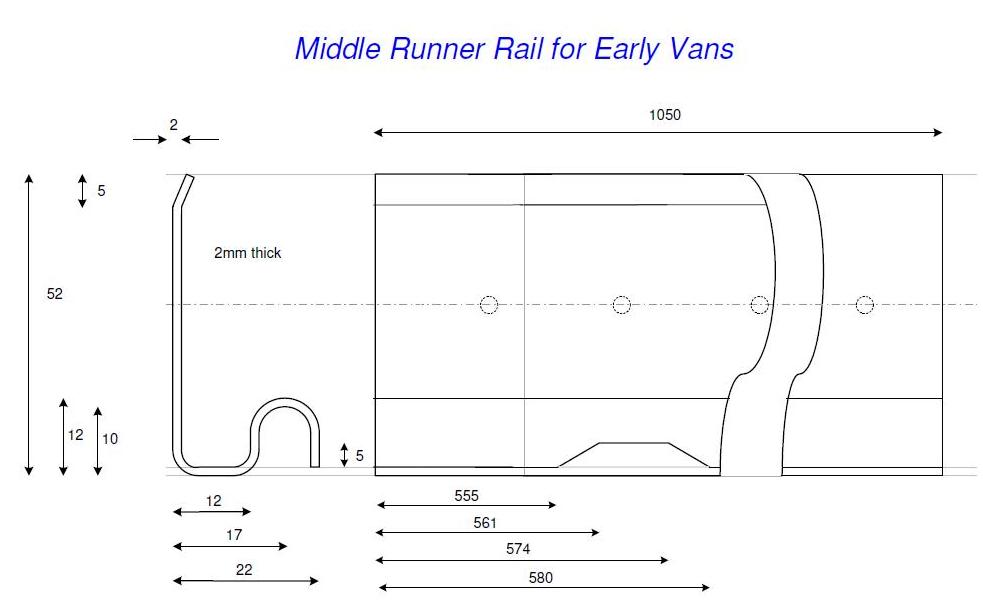
In the interim, I have researched and asked the VW forum for information on the centre rail dimensions.
I knew the end-view profile as I had measured my remnants.
But it took another forum friend to give the position of the rail relief / cut out for allowing removal of the sliding door.
A picture of his rail...

My usual visio sketch
Re: My VERY RUSTY VW T25 Camper Van Project
Posted: Fri Oct 06, 2023 12:26 pm
by Envoy CDX
Measure multiple times cut once, very gingerly
Re: My VERY RUSTY VW T25 Camper Van Project
Posted: Sat Oct 07, 2023 2:01 am
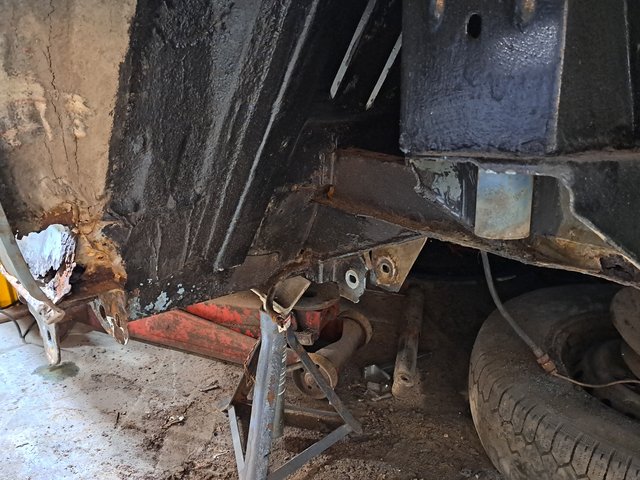
by Robsey
More holes...
More rust-fest.
I levelled the top of the window frame.
It was tapered downwards towards the rear.
It is level now.
The masking tape is there ready to mark out the required hole size...
I believe it is 7mm gap between the glass and the metal skin.
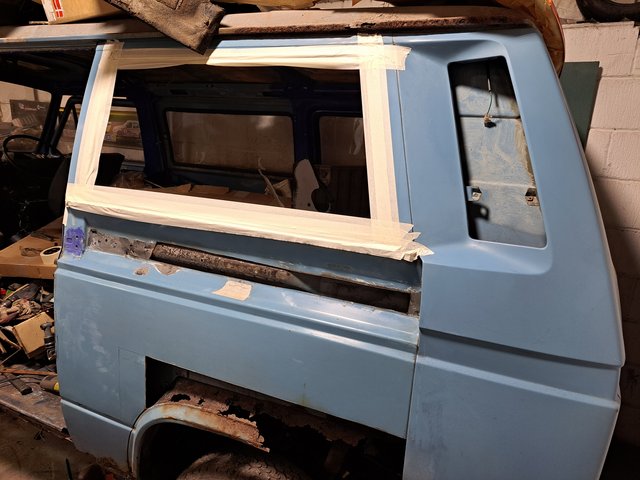
I cut forward to cut past the crease in the lower skin.
It turned out that the crease ran to the front edge of the panel.
So the whole thing was cut away.
The C post is quite solid, just needs the bottom reconstructing.
Re: My VERY RUSTY VW T25 Camper Van Project
Posted: Sat Oct 07, 2023 10:06 am
by Envoy CDX
Excellent, bit of fabrication, always fun (and frustrating at times).
Re: My VERY RUSTY VW T25 Camper Van Project
Posted: Sat Oct 07, 2023 11:27 am
by Robsey
No fabrication yet fella...
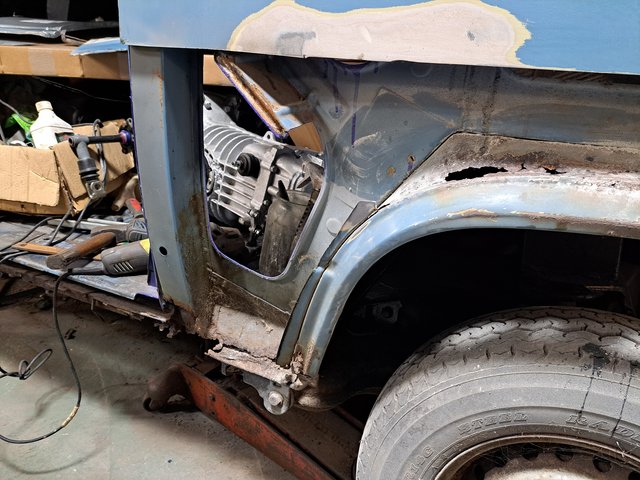
The glass window is buried under some panels, so no chance of test fitting and drawing the profile on the masking.
Just more cutting out....
The suspension mount is usually badly rotten and hidden out of sight. But I was able jack the car up a few times without anything collapsing or moving.
The panels are shot, but not load bearing - so all good.
Re: My VERY RUSTY VW T25 Camper Van Project
Posted: Sat Oct 07, 2023 1:19 pm
by 3cav3
It looks better than my van did when I was at that stage. Once the side is back on I'm sure it'll feel like a massive step forward.
Re: My VERY RUSTY VW T25 Camper Van Project
Posted: Sat Oct 07, 2023 5:15 pm
by Envoy CDX
Robsey wrote: ↑Sat Oct 07, 2023 11:27 am
No fabrication yet fella...
The glass window is buried under some panels, so no chance of test fitting and drawing the profile on the masking.
Just more cutting out....
The suspension mount is usually badly rotten and hidden out of sight. But I was able jack the car up a few times without anything collapsing or moving.
The panels are shot, but not load bearing - so all good.
As long as the main bulk is solid, the rest is replaceable.
Re: My VERY RUSTY VW T25 Camper Van Project
Posted: Sat Oct 14, 2023 1:09 am
by Robsey
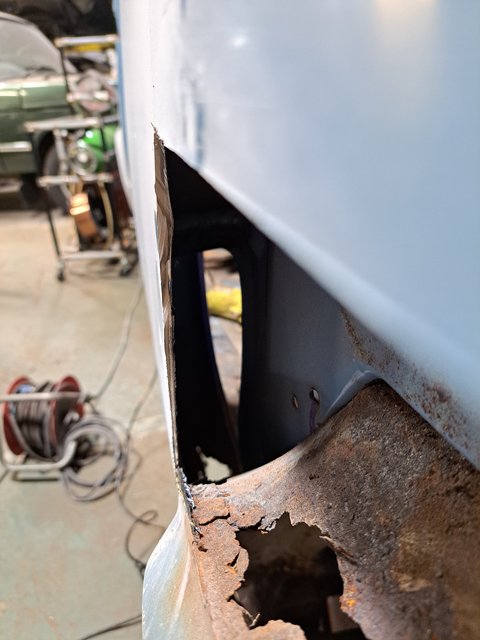
More removal today.
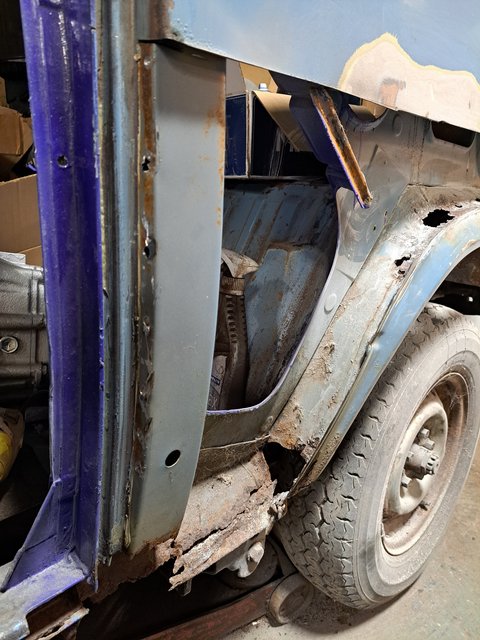
Firstly to see how far up the side panel, the body filler actually went.
Oops look like another collision mark, or something caught between the sliding door and the panel.

Sanded away all the body filler, until I ended up with this.
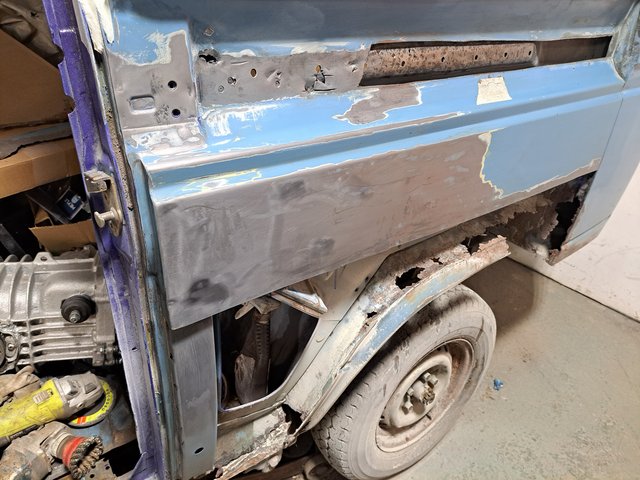
Must have removed a few pounds in weight from the van
Not sure if it is necessary or not, but my head said remove the wheel to give better access to the arch area.

And then I removed the whole hub assembly.
Weighs a ton...(not literally).
And the suspension damper.
That gives access to see this mass of rust and holes.

I am good at losing stuff, so I refitted all the bolts back into the hub carrier and the damper mounts.
Re: My VERY RUSTY VW T25 Camper Van Project
Posted: Sun Oct 15, 2023 1:23 am
by Envoy CDX
It's coming along Rob. It'll look great soon enough.
Re: My VERY RUSTY VW T25 Camper Van Project
Posted: Sun Oct 15, 2023 10:06 am
by Robsey
That is nice of you to say Gary.
If I was to para-phrase a comment from Troy, that he made about the Cavalier in 2015 / 2016.
"
This is the worst car that I have ever seen, that wasn't scrapped"
I see a theme running through my restorations -

Re: My VERY RUSTY VW T25 Camper Van Project
Posted: Mon Oct 16, 2023 11:58 pm
by Envoy CDX
Heh, I do feel bad about taking the Yaris off you, on occasion (but never for very long).
It'll come together, I personally will never understand why VW's command the money for parts that people pay though
Re: My VERY RUSTY VW T25 Camper Van Project
Posted: Tue Oct 17, 2023 7:52 pm
by Robsey
Don't feel bad fella - even for a second.
The missus insisted that I got shut of the Yaris.
If I had kept it, then she would still be whinging now - lol.
I have no idea why VW parts cost so much.
As to why I pay - because the missus wants the van done.
Another theme emerging - lol.
Re: My VERY RUSTY VW T25 Camper Van Project
Posted: Tue Oct 17, 2023 8:25 pm
by Envoy CDX
Robsey wrote: ↑Tue Oct 17, 2023 7:52 pm
Don't feel bad fella - even for a second.
The missus insisted that I got shut of the Yaris.
If I had kept it, then she would still be whinging now - lol.
I have no idea why VW parts cost so much.
As to why I pay - because the missus wants the van done.
Another theme emerging - lol.

Re: My VERY RUSTY VW T25 Camper Van Project
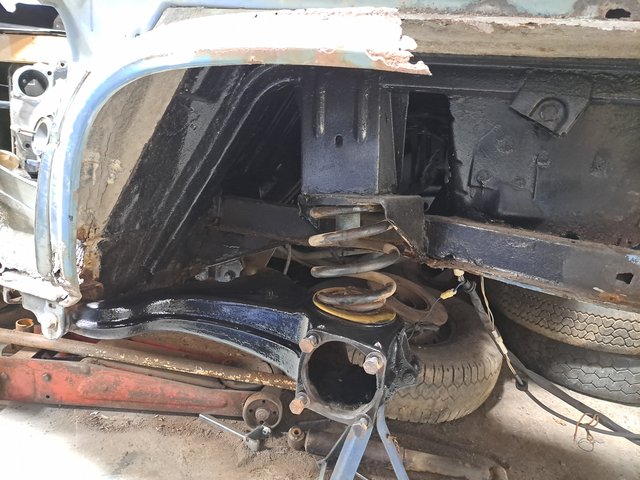
Posted: Wed Oct 18, 2023 1:16 am
by Robsey
Tonight's three hours of fun...
Was spent trying to get the trailing arm out.
What a complete turkey of a job :/
The trailing arms each have two bushes.

These old beasts have truly independent suspension.
Unlike the Cavalier that has one full width rear beam arrangement.
The bolt for the inner bush came out without too much drama, although the nut made lots of cracking noises as I slowly wound it off the bolt.
The outer bush pivot bolt was having none of it, and promptly sheared it's head off.
There was not enough room to get a saw or cutting disc in, without creating even more damage.

I tried drilling the bolt out, but progress was very slow.

Although it should have been a 19mm nut, due to corrosion I was able to knock a 17mm socket on.
The nut relented, with the familiar cracking noises for good measure.
But the bolt remained stubbonly inside the bush.
Time for a temper tantrum.
A lot of cursing and wrestling eventually got the arm out.
The only option was to remove the whole bush.
This was achieved by drilling the rubber between the arm and the central sleeve.
the bush removed and the arm cleaned and painted with phosphoric acid to convert the surface corrosion.
Amszingly the arm, and especially the spring seat were in good condition.
Only mild surface corrosion. Nothing structural.
The picture looks worse than it was in reality.

More shinanigans on Friday no doubt.
UPDATE - No more shinanigans for several weeks.
Hopefully some progress in December ???