As if I needed any more prompting, PVS tickets and the Total Vauxhall ‘Rare and Iconic’ stand pass arrived at the back end of last week. I believe this qualifies as some kind of deadline:

The tried and tested caravan dehumidifiers have been working well while the car has been under cover and tucked away. I couldn’t recommend these enough and use them in all my cars. They fit perfectly in the storage compartment behind the handbrake of a Cavalier too:


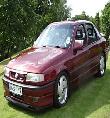
Like all good Cavalier Turbos, mine came with a number of niggles that are in need of some attention. As the car has been a ‘garage queen’ over the winter, and as I’ve been busy on other projects, I haven’t troubled myself with getting around to sorting any of them out. Nevertheless, as the MOT was due I thought I might as well run it up to the test centre to see what I’m duty bound to look at in addition to the non-MOT bits I want to play with. As it transpired, the car needed headlamp adjustment and a small patch of welding on the back of the passenger side sill. Thankfully it was a small area that was in isolation and didn’t cause too much of a headache:


And a liberal coating of sealer/guard:

We then nipped back up to the test centre and the car passed. Hoorah! I would say the car ‘got a green ticket’ but obviously these days the MOT certificate is more like something your mate knocked up in Excel than an important piece of paperwork from the Ministry of Transport. This must be the easiest document in the world to forge. Oh well.
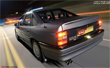
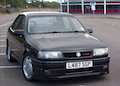
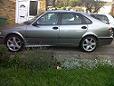
So we were now road legal for another twelve months and what better way to celebrate than a trip over to my mates bodyshop to sort out a couple of minor annoyances (with the car, not him!). At some point in the recent past the car has had a very light knock on the back end; perhaps the ol’ reversing-into-a-post routine, or maybe one of those irritations referred to as ‘other drivers’?! Who knows, but I noticed it when I first went to look at the car. It’s nothing major but unfortunately the knock had resulted in a slight dink at the top of rear panel behind the bumper. You can probably see the slight change in shape in the gap between the bumper and boot opening on the driver’s side in the pic below:

Now ordinarily this is entirely hidden from view, but the resulting dink meant that the driver’s side rear light didn’t sit as flush with the Turbo boot panel as I would have liked. It looked like the boot panel was sitting slightly proud, but in fact it was the light cluster slightly further back than it should have been. Furthermore, the boot panel reflector had a slight crack in it and the light cluster itself was marked, presumably both as a result of the now infamous dink. This was one of the reasons I got hold of some new rear lights (the ones that I promptly de-tangoed in an earlier post):

Original lights:

With the panel straightened, the light cluster lined up perfectly which put a smile on my face. After a quick adjustment to the bootlid our work on the rear of the car was done. Next up was a small dink on the front end near the headlight (forgot to take picture of that). It was barely noticeable but was worth sorting anyway. With that completely gone, we turned our attention to the bonnet which has been removed at some point or another but not put back on 100% straight. We soon found out what was causing it to feel sloppy when it you dropped the hood haha!

I also had another good look at the condition of the inner arches and boot floor to see if they were still sound and was pleased to see you could eat your dinner off of them (well, almost...). Will give this a proper clean at a later date:


I bought a replacement Turbo boot panel from our friend Cavalier-C20LET which I think originally came off of Cavhopper’s car before it went to the great scrapyard in the sky. There isn’t a single mark on the reflectors, not even the suggestion of a hairline crack, and it is already Satin Red so this makes the ideal replacement for my original panel without me having to use the brand new one I have reserved for my V6. This will be going on the car shortly:


With the car back in my garage it was time to get her up on axle stands and prepare some bits for a trip to the powdercoaters. I picked up a bargain LET timing belt and cam cover on the ‘bay, complete with plug cover and oil cap. The cam cover had a very bizarre paint job, as though it had been mock-polished and then someone had tried to paint a gradient of colour around the edge. It was ideal for stripping but a baffling choice of finish:


‘Muppets’ may well be appropriate...

...especially as one of the breathers was actually sealed shut with paint!

Having removed the blockage I thought I’d strip it and apply the SBD insipired breather mod before it goes away for media blasting:


...and remaining part ready to be cleaned up and refitted:

With the wheels off I checked the condition of the discs and wishbones etc, mainly because I’d just had to fit new arms to the V6 so figured the Turbo might be in need of some attention in that department too. Thankfully the discs looked healthy enough and the CV’s and suspension arms look like they’ve been replaced in the recent past. Bingo by jingo!

The wheels are also off to the powdercoaters where they will be receiving an acid bath, a media blast, remedial work and colour etc. The one thing that foxes most of us with Cavalier or Calibra Turbo alloys is the centre caps as the centres are an odd size (not quite the 55mm found elsewhere iirc). As I had some spare Astra Mk4 centre caps I thought I’d play around and see if I could combine the two.
I’ve amassed quite a few of these so dismantled the worst four:


The Astra griffin emblem is clipped into place, whereas the Cavalier centre is glued on. The Astra item is also smaller and the bit of the centre cap that shows through the badge is unlikely to be completely smooth on the Cavalier so I decided to order some alu-vinyl centre cap emblems off of the ‘bay and see what I could do with them. I will report back when they turn up.

The Cavalier centre caps were thrown in the box with the cam cover and timing belt cover ready for some rubbing down and colour. I did try and fit the Astra Mk4 centre cap as it is but it’s just too small. A shame as it looks pretty neat:

I recently bought a spare set of wheels so these are on standby to help roll the car about while the ‘proper’ wheels are at the powdercoaters. These are Cavalier Turbo alloys again, but have been painted black. One had a slight air leak so I whizzed it down to the tyre centre and had it repaired. The tyres aren’t brilliant but for what I need them for at the moment they’re just the ticket:

I came across some red strut tops in a box of bits which were intended to be placed on the V6. They were nice enough but not what I want for this engine bay so they’ve been sent to the powdercoaters too and will be put on this car instead. I also removed the bonnet stay and threw that in the box! All the parts, including the wheels, are being powdercoated in the same bright silver with a slight sparkle added to them. They should look pretty good.

Anyway, next up it was time to drop all the fluids starting with engine oil and the F28 transmission oil... and not before time:

The contents of an F28. Yuk:

In the process my ratchet's directional switch thingy broke, so off to Halfords for an exchange. Keep your receipts folks; this one was four years old! Apparently ‘lifetime guarantee’ means exactly that:

..and the shiny new replacement!

A box of joy arrived; lots of gearbox oil, diff oil, gaskets, bulbs, new header tank, screws, bolts etc and a LUK clutch kit for the F28. My release bearing is starting to complain a bit so that’s one of the jobs destined for later in the summer:

More to follow as I'm suffering from tea deprivation right now.